Items
Template
Maintenance Entry
-
Philips PM3632 Logic Analyzer intake and cleaning This PM3632 Philips logic analyzer was cleaned and had its tilting bail replaced. The device was sold as working and the display does turn on but is partially of the screen. Vertical and horizontal adjustments are needed.
-
Broken Philips PM3632 Logic Analyzer intake and cleaning After some initial pictures the device was thoroughly cleaned using wet wipes and paper towels. Further disassembly allowed to take several pictures of the internals. The tilting bail as well as several cover plates were swapped with another PM3632. This device will be used for spare parts as it is currently not functional. Upon power on the device makes a very high pitched noise and the CRT does not display an image. However, a brief flash can be seen the instant of power on. When pressing buttons the device still beeps so digitally it is likely fine.
-
Philips PM5715 Pulse Generator intake and cleaning The Philips PM5715 was sold as working and was thoroughly demonstrated. However, the device is quite dirty and needed proper cleaning. In addition, the tilting bail handle was fixed as it had split into several pieces. The repair
-
No more display output on the Hameg hm1005 Unfortunately, the output has disappeared from the Hameg hm1005. This is most likely caused by the previous repair to the final vertical amplifier. The problem seems to manifest slightly differently as the under and over scan indicators do not seems to suggest the trace is off screen. Hopefully none of the transistors are damaged as the vertical amplifier is carefully balanced using complementary pairs of transistors for all its half a dozen stages. We should investigate the cause at some point. Starting with blanking circuits and afterwards following the signal paths from were both inputs are combined into the amplifier. It should be noted that there is also no horizontal output or deflection so perhaps the HV power supply has issues.
-
 Philips PM6654 timer final cleaning and installation The exterior of the Philips PM6654 is cleaned using wet wipes, paper towels and some light detergent. Primarily the top cover had several stains. Afterwards the device was fully reassembled and placed in a more permanent position next to the Hameg HM1005.
 -
Philips PM6654 intake and display repair The initial intake of the Philips PM6654 went pretty smoothly. Most features are tested including frequency, pulse width, rise and fall time and phase. Particularly rise and fall time as well as phase measurements seem quite sensitive and it is difficult to produce good readings. This aligns with the user and service manuals were these measurements are averaged and require substantial dead time between measurements. All operations do seem within specification so no adjustments are needed. However, the display does show weaknesses. This included the first 3/4 decimals not lighting up, the second function column not lighting up and the display of Hz / Seconds / Volts being intermittent. Upon investigation the cause was found to be a tiny piece of metal that was hanging from a spider web. This spider web was in close proximity to pins on the rear shorting them together intermittently. Removing this piece of metal as well as some general debris removal resolved the issue entirely.
-
Broken B input The B input of the PM3206 has stopped working from 50mv/div and above. Does not appear to be a loose connection. Needs further investigation
-
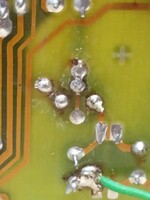
 Hameg HM 1005 oscilloscope repair The vertical deflection driver for the CRT had been known bad for quite some time. Upon investigation a damaged trace was found (image 1) on one side of the totem pole drivers and it was bridged (image 2). After this the unit appeared fully functional if not for several intermittent potentiometers. After identifying several of these potentiometers including, brightness, focus and timebase further ailments where discovered. These include the misalignment of the delay and regular timebase. The timebases where promptly realigned by adjusting the belt (image 3). Finally, the front panel was cleaned (image 4 and 5). The final steps remain to clean or replace misbehaving potentiometers.
 -
Line filter replacement of Rifa capacitors. An attempt was made to replace the Rifa capacitors in the line filter used by a HP1653B. The outer casing was cut open using a dremel but revealed the inside is potted. No further attempt where made to remove the potting. Instead the filter was put together using conductive tape and put back inside the unit.
-
Further reformation of electrolytic capacitors for the PM3410 Further reformed electrolytic capacitors, this time for the two sub-assemblies of the PM3410. No real signs of large leakage although current consumption on several capacitors was quite high. This was to be expected as they are connected across the power supply lines so essentially the current consumption was just the standby current of the sub-assembly. The capacitors showed no signs of internal heating (tested using infrared thermometer).
-
Reformed electrolytic capacitors All electrolytic capacitors on this part have been reformed by increasing the DC voltage up to either 58 volts or 2 volts below the maximum rating of the capacitor. None of the capacitors showed unusually large leakage or tended to lose charge quickly. It is deemed unnecessary to replace any of these capacitors. However, given the large maximum voltage of most capacitors a power up cycle using a variac is still deemed necessary.
-
Complete cleaning of parts All parts have been cleaned using a rag shirt and progress can continue with electrical inspection
-
Physically Inspection and partial cleaning Device is disassembled into half a dozen parts to investigate the internals. Several parts of the disassembly are cleaned using a rag shirt as to not scratch or damage to soft metals. Overall the device is decent conditions as there are no visible signs of corrosion. If any corrosion in is on the top surface of trimmer resistors as is quite common in this line of Philips devices. Most electrolytic capacitors have a rubber gasket at the bottom which shows visible signs of wear. It is unclear if this wear is due to leaking, this is something that must be thoroughly investigated before power up.